Monday, March 7, 2011

116 March Challenge: Project "Household Binder" {intro}

I may be the last one to join the Household Management Binder game, but if I am not, feel free to join along with me to get one created this month!

Actually, I know at least one other soul that hasn't done her Household Management Binder yet!  Maurika wrote:


My name is Maurika. I just found your blog a few days ago, and I love it!!  I can easily stay on it for hours!!  You have so many great ideas!!  I just had one question for you.  I was wondering if you have a Homekeeping binder or something similar?  It's basically a binder that you would keep your budget, recipes, cleaning list and etc in.  I wanted one place where I can grab one thing and it contain everything I need - grocery shopping list, cleaning list, recipes, budget and the like.  I also LOVE binders!! lol. Well, I probably wouldn't keep recipes in it, but i think you get the idea of what I'm trying to say. 
Do you have any suggestions or ideas for me for keeping these things together in one central place?
Thanks!!
Sincerely,
Maurika

I let Maurika know that I had been itching to get one of these done for quite awhile now, and I couldn't wait to make this my March challenge!

Today we are kicking off the challenge by giving you the assignment to snag some sort of binder.  Just your standard binder will do, doesn't have to be fancy pantsy!  {You can always take a standard binder and pop in decorative scrapbook paper or make a coversheet to pretty things up a bit!  I am always game for that!}  Here is one I had picked up from Target a couple of months ago, with this very project in mind.


What can I say, I am such a sucker for bright colors and fun patterns!!!


I also had some extra dividers on hand, but I am pretty sure I will need another set for this project, since I am planning on making this binder work hard for us!  Now, if only I can find a matching set!


Here are a couple of the ways that I was planning on using this binder:
  • Freezer Inventory
  • Important School/Sporting Information/Schedules
  • Movie Inventory
  • Cleaning Checklist
  • Menu Planning Ideas
  • Finances/Bill Payment Checklist
  • Product/Warranty Information
  • Important Contact Numbers
However, since we are doing this "TOGETHER", I would like to know what other categories we should touch on this month and add into the binder? {That's your queue to leave me a comment with this info...}  :)

And to help everyone out along the way, I will be creating and sharing some new "FREE" printables!  Are bells chiming?  I said F R E E my friends!  Of course, they won't be free forever, just this month, so make sure to snag them up as they are available!

So who's with me!?  Or is it just Maurika and I creating management binders on an island alone somewhere?  If you already have on of these home necessities, what are the most beneficial pieces to it?  What am I forgetting to add?


I decided a little challenge would be fun! This month we are creating a Home Management Binder!  Wanna Join in?  Take photos and blog about your awesomeness as you go!  I am hoping to do a giant, "We did it!" celebratory post where we can all link up our binder creating success stories at the end of the month!

Friday, March 4, 2011

58 Project Teal: Chalk It To Me! Again!

My first attempt bringing in chalkboard/chalk was a success!  Although, it wasn't all that exciting, I just snagged up some pre-made chalkboard labels and wrote on them with chalk....


This time, I decided to tackle my next chalkboard project, DIY style!

Ever since I have been watching everyone whip up their own version of a chalkboard memo board, I knew I had to get in on the action!  It would be the perfect addition to our kitchen, a place to write reminders and love notes and for the kiddos to draw pictures!

I searched for awhile for the perfect picture frame to turn into a memo board.  It had to be long and narrow since it was going to be placed in an awkward location...

Then, while perusing through our local Habitat for Humanity ReStore, I stumbled across a cabinet door, for $5!  And it was the PERFECT solution!


The edges were in great condition, they just needed a quick sanding to smooth them out a bit....


Then, I taped things off, and got to work painting the center with Rustoleum Chalkboard Paint .  I was surprised how easily and how smooth this paint went on!  And I risked using a cheapo brush because I wasn't sure how easy cleanup was either.  And even with an average brush, the streaking was minimal {you can't tell that from this picture, but it seriously dried with no streaks}!


I did two coats, just in case!


Then, I used a sample sized Behr Premium Plus in "Dragonfly", for the outer edges of the cabinet door.  {I forgot to photograph this part, but you guessed it, it's a tealish color!}.


Then, we just attached some large ring hangers to the back.... {we did use two screws... I was just making sure not to forget to photograph this part!}


And then popped it up onto the wall!


It fits perfectly in such an odd place in our kitchen!


And I just love how the chalk sits perfectly on the ledge!


But how does it work?

Fantastically!


Seriously, I have the world's worst phobia of chalk, it makes my hair stand and my teeth hurt, but other than that, the project itself it just wonderful!  I am so excited to check out liquid chalk and use this board for everything!  And it goes perfectly with my Project Teal challenge

The real pleasure is watching Parker enjoy it!


Too precious!


He drew me an elephant {in case you couldn't tell what it is}


Who else has been having fun with chalkboard paint?  I can't wait to use it again, this next time I am thinking the little boy's room.  My wheels are a spinning and because I have so much left over, I definitely have to use it somewhere!

What else have you been using chalkboard paint on?  Jar labels?  As art?  How about any good finds at your local Habitat ReStore?


Psssst!  Update!  Two days into this and I am not gonna lie... I am about to have a chalk breakdown... I don't know if my body can ward off the gross tingles much longer... but the kids are lovin' it!


Thursday, March 3, 2011

6 February Challenge: Project Photography {PARTY!!}

So much to do, so few days to do it!  Seriously, February felt like the shortest month ever!  Weird, it was...

And when you try to squeeze 28 days plus a family getaway in there... that leaves like NO time to finish up a monthly challenge...  wait, what?

For those that did, WOW, go you!  Maybe you were already on the right track before February hit.  Maybe you were determined!  Maybe you are a magician!  However you did it, go ahead and leap excitedly around your current surroundings.  You deserve an award for your awesomeness!!

And you know what?  If you are with me, and are not completely finished with the photography challenge, get off your booties and leap around with me anyway!

That's right!  This is a project that will be ongoing ALL YEAR!  Just like project paper, this one doesn't happen over night.  It's about setting up a system that's easy to maintain {which I did, wahoo!}, and then plugging away at the back-log.  I am still hitting 15 minutes per day, and will be for awhile, until all my photos are purged and in happy correct folders.

And I still have an ongoing "Photography To Do" list, which I will continue to share with you as I go, like coming up with a special way to display our vacation photos {I do have an idea up my sleeve}, and burn files to dvd disc once they are organized {and store a copy of them in a safety deposit box off site}.  Again, I will share as I get there... they are absolutely on my list!

But we are celebrating anyway!  Because we are off to an incredible start!  So far we have:


And getting that much accomplished in 28 quick days is VERY incredible!  And worth celebrating!  We are far further than we were at the beginning of the month!

So, how am I going to stay on task and ensure this gets done?  Well, I have a special bottle of wine I am not touching until I am done, it's my reward {although, preserving memories is award enough right?}

And I am the type that will not sleep well until it's done anyway.... so in the planner there will be time blocked for this project until I am current.  End.  Of.  Story.

Oh, and I wanted to point out, slightly off subject, but with all the recent updates to IHeart Organizing's page, I added a tab to the top of the page that has a link list of all the of projects I have completed.  It should make finding things easier to reference.  It also includes these monthly projects so you can follow along at your own set pace!  Now that's some good thinking right there!

Anywho, this is my favorite part of the whole project venture.  And although there may be some rule about how many link parties you can host in a two week period, call the linky police because I obviously am breaking a linky party rule!  Wahoo!


IHeart Organizing


Congratulations on your accomplishments!  And enjoy that feeling of getting things done! 

Thanks so much everyone, for following along and making another monthly challenge such a success!  I had so much great feedback that individuals would like to continue these challenges, so next month, er, this month, we are doing another!!

Got a photography story to share?  How about "A HA!" moments?  What was your favorite part of this project?  Anyone get tearful looking back on memories of photos past?  My boys sure had fun looking at their baby pictures, made me wonder why I didn't have them out at their finger tips sooner!


Wednesday, March 2, 2011

18 Reader Space: Simple Shoe Solution

The entryway.  The landing.  The launch pad.  The first impression upon entering the home...

This area tends to be one that is always a challenge to figure out.  Piles of shoes, jackets, winter gear.... The most unsightly of items, yet a crucial place in our home.  Many times, this area just isn't big enough and space both on the floor and the wall is somewhat limited.  Which typically requires some critical thinking!

Elisabeth had a similar situation, and shared her story with me:

Hi!
I am totally new to your blog.  I found it from a friend of a friend of a friend's blog.  You get the idea, right?   Anyway, a while back i used one of  those over the door shoe organizer thingies in our hall closet and it changed my life!  You can read about it here: http://bovagoods.blogspot.com/2009/11/organized-goods-shoe-corner-is-no-more.html
Love your blog and can not wait to spend some time devouring it!
XO,
Elisabeth

The key sentence that stood out for me was, "Changed my life!"  That's what it's about!  Finding simple solutions that make a positive impact to your life and your home.

Elisabeth blogged:

If there is one thing I would change about my house it's that we don't have a mud room or a downstairs laundry room.  We have a tiny coat closet and some peg boards that my husband crafted, but that is it.  The door from the garage enters right-smack-dab into our kitchen.  We typically take our shoes off when we come inside and it ends up looking like this:

 
This is our "shoe corner".  It's barely even a corner and resides in the main traffic area of our kitchen/family room.  You can see that i made an attempt with a cute market tote but alas...the shoes end up spilling over onto the floor.  The other day I was at Walmart and spotted this. A basic over-the-door shoe rack {it's cheaper in the store than online}.  Why didn't i think of this before?  Brilliant!  Now our shoes are nicely organized and hidden away in the coat closet.  I love this solution because it doesn't take up floor space, the shoes are easily accessible - no more digging through the market tote looking for a lost shoe, they are hidden away from sight, and Lucy and Eloise can easily reach their shoes on the bottom four rows.  When Eloise walked in the door from school the other day she yelled, "What happened to the shoe corner?"  I was happy to tell her it is no more!


I seriously had to look back and forth at those pictures to see if it was the same space!  All the difference one shoe rack can make.  It's the finds and solutions like that, that make my day.  And it's why IHeart Organizing!  You can feel the difference that one investment will make for her family!

And don't you just adore those pegs her hubs installed?  Genius.  And the blue walls... pitter patter!  And if you think she did a great job here, wait til you check out more of her blog, she is an organizing guru.  She even did a major clothes organizing overhaul that had me mega impressed!

So let's talk entrances today.  How in the world do you keep yours in order?  IHeart Organizing, but entries can be a thorn in my side... well, maybe I am bitter since our front door opens to the top of our stairs and gives us a landing that's only 3 feet 3 inches wide.  Yep.  And it's the first impression when you walk into the home... one little landing and one wall.... urg.  So I really gotta snag up some additional insperation from you fabulous friends! 


And a button for you!


IHeart Organizing


And what's your favorite part from today's Reader Space?  The incredible change one quick update can make?  The lovely colors in her home?  Those pegs on the wall?  What simple solution was a life changer for you?


P.S.  Have an awesome organizing story to share?  I am looking for projects that have made a positive impact to your life.  Please send your story and photos to iheartorganizing@gmail.com and I would heart to feature them right here, on the blog!!  Photos should be high resolution and un-editted.  Please include a description of the project, including any costs, inspiration, and how it has changed your routine for the better is so helpful!  Oh, and no worries my friends, we will NEVER judge "before" pictures because that just wouldn't be nice!  Only love goes on at this blog!

Tuesday, March 1, 2011

17 Got 15? Nothing "Junky" about this challenge!

Last week I pushed out a little mini-challenge and you all have really been rockin' out those drawers!  Thank YOU so much to everyone who has been linking up their awesomeness to share with us this week!

Oh my, have you been back to look at all the linked up inspiration?  So much fun!  Here are a couple of the drawers you will see....


Common theme amongst all these incredibly organized and functional drawers?  I would say, containerization.  There are days when I think that a junk drawer is just a dumping ground and it shouldn't exist because everything needs a place.  But the junk drawer IS THE PLACE for misc. items that really have no where else to go!  But, junk drawers can also quickly get out of hand, unless dividers and containers are brought in.

Containerizing keeps items in categories so they will be easier to find!  Plus, it reduces them from rolling around into the drawer and meshing into a giant pile of mess!  Lastly, it makes it more challenging to just dump every random thing into the drawer when containers are in the way!  That's a good thing!

I see everyone got really creative with their containers.  Mesh baskets, leftover boxes, bowls and yogurt cups.  It shows it doesn't necessarily matter WHAT you use, anything can become a container!  Love the no moola makeovers!

So I promised to share in this excitement and tackle my own drawer as well!

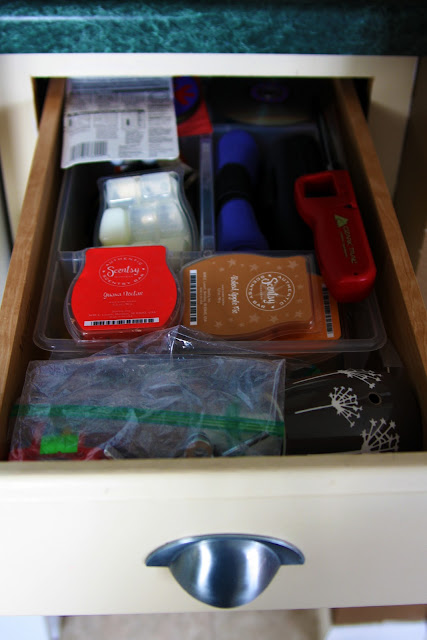
I started with this, which already had a drawer divider {from Ikea}, I just wasn't using it correctly....


I pulled everything out and dumped it on the counter.


Then, I lined the drawer just like I did here for the utensil drawers.

And I sorted through all the items on the counter.... How many screwdrivers do we really need?


It's hard to tell, but there are categories going on here.....


Baggies of misc. hardware, command hooks and magnet clips galore, Scentsy scents, random useless items... you name it, that's what the drawer is for right?

Here is the important part.  I realized that the drawer was becoming a dumping ground for some items that already had real homes.... back to their homes they went.  Like screwdrivers and misc hardware, which had bins in the garage.

This paired down a lot of the items, the rest either went into the garbage or back into the drawer.


Ahhhh, much better!

Starting in the back, the Scentsy packages got snipped down a little to fit standing up and still be able to close the drawer:


All of the Command Hooks and other hooks and clips all were categorized together in another compartment:


The Mr. got his own compartment:


And so did I!


Some hardware I am planning on using soon, got to stay, along with a tape measure and one phillip screwdriver and on flat head. 


And that's it!  Final Before and After?


SO much better!  And in under 15 minutes!  Leaving lots of time for a good happy dance around the kitchen.  I always say, it's the little things!

Link up party ends today, I can't wait to dig through more and more inspiration!

What do you think?  Oodles of greatness going on right?  Who else is motivated to hop onto this 15 minute challenge?  Those that are done, how easy was it?  What items have you been finding that has surprised you?  A winning lottery ticket or a lost piece of jewelry?  Let's chat!