


But let's start from the beginning. This was not an overnight process, but once we got started, it was done within a few quick hours. A few weeks ago I went from problem space to problem space, just sorting things to the correct areas. Everything from around the house and the garage that was garden and yard maintenance related, was stuffed into our shed {and a few things that were in the shed were removed and placed back where they belonged as well}. After the big sort, here is how it was left.

Zero knowledge of where anything was or what we even had, but at least we now knew where to dig for gardening tools should we need something.
The very first step to any big organizing project is to remove everything and determine what you need to organize/store.

I always love a blank slate, although, not sure my neighbors loved this view...

We picked through every last item and found a lot of duplicate yard tools {which will be gifted to family or placed for free on Craigslist}, and also moved a few other items to our donate pile.
Once we knew what was left to store and place back into the shed, we determined that a wall of pegboard would help keep our everyday yard tools easy to access. No more purchasing extra hose nozzles or sprinklers because they "walked away".
Then color challenge time came! You may remember a few of the other challenges I have participated in; pink, gold and purple. This round, we all decided to focus on something yellow. A color I don't use often, but tend to love due to the sunny and happy feeling it emotes.

Knowing that the shed was on our list and I wanted to find a way to incorporate the color in that space, I landed on the idea to add a decorative yellow stencil to the pegboard. This would give the garden shed a little extra dose of sweetness and hopefully help it to become a space I am excited to use and maintain, vs. avoid like I have been for the past few years.
Bryan measured and pre-cut two 4 x 4 ft pieces of pegboard down to accommodate the slope of the shed ceiling. We then placed the two pieces on a drop cloth on a level surface in the garage.

We also used some painters tape to hold the two pieces together to allow the stencil to flow seamlessly between them both. We went with Glidden's Lemon Ice and a fuzzy roller to get the nicest, thickest coverage.

To prevent the paint from seeping below the stencil, we sprayed the back with a light layer of spray adhesive. I highly recommend doing this step,
A few minutes later and we were well on our way to a pretty piece of yellow stenciled pegboard!

While the stencil dried, I brought a giant bucket of warm soapy water out to the yard and began scrubbing down everything {because it was all duuuuuuuusty}. Everything from flower food to seed spreaders to my garden shovel received a nice little bath. I love this step because everything goes back into the space looking nice and new. I also tossed extra rags and my gardening gloves into the washer. Sometimes it is the small details that are a huge impact to the end result.
We let the pegboard dry in the garage with a breeze blowing through, so it didn't take too long before Bryan was able to install it with simple wood screws.

By this time, the sun was shining directly into the shed, and it was glimmering in the light. The pegboard actually appeared iridescent in the sunlight which created a really neat effect with the stencil. Bryan also installed a few white cabinets that we had previously removed from above our workbench in our garage, as they were no longer needed there with the newly built overhead storage.
I told Bryan I wish I would have taken a time lapse video of us putting everything back. It was good fun and as always, my favorite part of the process.

We already had some old wire shelves installed on the opposite wall, they just received a little de-cluttering and sprucing up.

And a scrap piece of wood screwed between two studs allowed us to add larger screw in hooks to hold bulkier tools like our weed trimmer and leaf blower.

The back wall is my spot though. Can you guess why?

Seriously guys, it makes me want to go to gardening school.

Here is what I did.
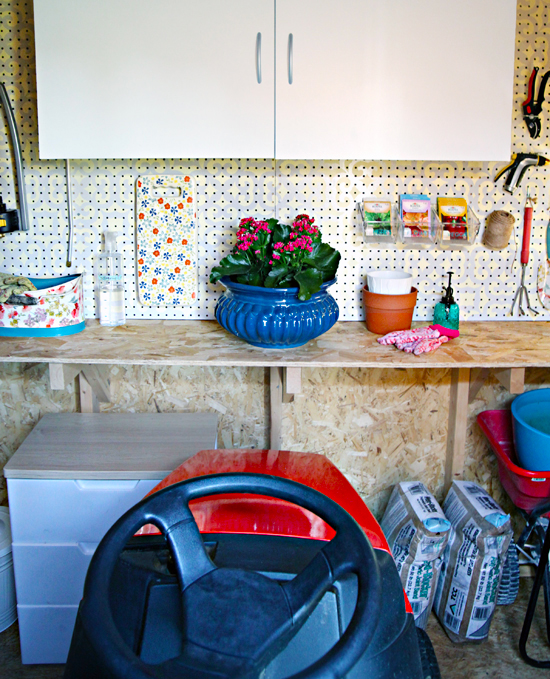
On the left, seed spreaders and sprinklers were hung with peg hooks. The shelf below holds my watering can and a garden caddy. I just love how the caddy can be filled with my tools while I work on our yard or garden, and then everything can be put back when I am done.

The two cabinets Bryan installed were filled with all of the bulky items. The right side holds plant foods and weed killers while the left side is for my planters, cleaning rags, bug spray and sunscreen.

I also added a bottle of vinegar spray cleaner for those "just in case" moments. Because you know, things get dirty when you work on the yard.

I used my Silhouette to cut a few labels and attached them to the front of an acrylic organizer I found in the bathroom department at Target. The inner organizing nerd in me really came out because this is one of my favorite little touches.

I also used my Silhouette to label an empty paint can {found at Home Depot}, which is filled with bird seed.

And of course I painted the handle to the rake. Coral and yellow make my heart sing.
The wall to wall surface was already in place as it was installed as part of the shed kit, it just previously had been stacked with piles and couldn't be utilized for planting. Not anymore!


Below the counter is a small steel lidded bucket for trash and clean-ups and a plastic rolling cart which works great for storing opened bags of bulbs, soil and grass seed. Another tub of lawn care items and a seed spreader are also tucked away below.

And that completes the organized garden shed tour.


And a final before and after to celebrate together.

All we ended up purchasing were the two pieces of pegboard and the stencil paint, so I would say we definitely came out ahead on this project. I am a fan!
If you are loving yellow and looking for even more inspiring ways to use it around your home, check out these fabulous projects done by my talented friends below.
 |
| { Pantone Swatch Art / Organized Garden Shed / Pineapple Cookies / The Swish / Smile Favor Pouch / The Chair } |
.png)
this is so awesome! You are so inspiring! i hope once i get my first house i can organize it and decorate it like you do!
ReplyDeleteLooks amazing Jen!! You always know how to add the perfect touch! It's like a magical garden playhouse now!! Love it!!
ReplyDeleteIt's fabulous! I would never have thought to paint the pegboard, but now I can see what a difference it makes. That would work in any room or closet. Great job, y'all!
ReplyDeleteUm, I NEED your trowel and kneeling pad!
ReplyDeleteThe shed looks beautiful! Where did you get the blue soap dispenser?
ReplyDeleteHi BreAnne,
DeleteIt is a plant mister which I purchased at Target. :)
LOVE it Jen!!
ReplyDeleteI LOVE this and all of your posts!
ReplyDeleteAnother beautiful and well thought out project! Could you provide a list of sources. Like for example where the drawer unit with the wooden top is from, etc.
ReplyDeleteAbsolutely! I am currently traveling without my laptop so will try and do it soon. The cart is from Target: http://m.target.com/mobile/p/iris-3-drawer-chest-with-natural-finish-top/-/A-10338802. Let me know if there is anything else in the meantime!
DeleteThis makes me want to go gardening more and more! I only hope our shed will be as organized as yours when we move into our new home!
ReplyDeleteSo cute! I love this! Our shed is metal, so we can't hang anything on the walls. :( But we do have some peg board in our garage I use to hang my garden tools. Love the idea to paint it white. Makes it so bright and cheery!
ReplyDeleteI thought the same thing! Hub's idea of improving the shed is making it larger. I like what has been done with this one. SO the ideas will be going into that one for sure! Thanks for sharing.
DeleteJen, this is spectacular! We have just moved and have a 'bothy' (not sure if that is a worldwide term, but it is basically a little log cladded cabin) it is screaming out for a make over!
ReplyDeleteI love the peg board. Such a small detail, but super effective. x
We just had a shed built last week. :) I can't wait to get it finished and all organized. Yours looks so wonderful!!
ReplyDeleteLove it... I was wondering if you used your silhouette to cut your stencil?
ReplyDeleteHi Casey!
DeleteI actually had purchased this stencil awhile back for a project I had in mind for our laundry room, but knew it would work great her as well: That is my hope! :) Stencil is from Amazon: http://www.amazon.com/gp/aw/d/B00JBW3DWU
I have read you can cut stencils with the Silhouette however and I am really excited to try it sometime!
You have a magic in your hands :)
ReplyDeleteLove, love, LOVE. Now can you come over to my house and do the same thing with my gardening tools? ;-)
ReplyDeleteSounds like fun Jenny! Two Jens are better than one after all! ;)
DeleteWow! This came out great! My favorite part is that stenciled pegged wall! Love it!
ReplyDeleteIf my shed looked like this I'd probably visit it way more often! Which stencil did you use?
ReplyDeleteThat is my hope! :) Stencil is from Amazon: http://www.amazon.com/gp/aw/d/B00JBW3DWU
DeleteI just love the stenciled pegboard! Good job, it looks great!
ReplyDeleteHow big is your shed?
ReplyDeleteHi Tracey! The shed is about 8' x 10'. xoxo!
DeleteHi Jen, I love your blog! I found you about 6 months ago, when I was taking an 'organize your art biz' class, and i must have googled something that led me to you. I've subscribed ever since. I love your ideas, your photos and your fabulous tips. Thank you! Your blog really inspires me to be more organized, and in a beautiful way. Thanks sooo much! (I don't have a garden shed, but I do have a garage that could use some TLC!)
ReplyDeleteThanks so much Jane! So happy you found me! :)
DeleteThis is beautiful! I have shed envy! Thanks for the inspiration! :)
ReplyDeleteI LOVE the new garden line at Target! I spent waaayyy too long there salivating over everything. Like, hello? The water spraying thing? It's adorable!
ReplyDeleteSarah
www.sarahsdaybook.com
Another beautiful project! In the market fir a new shed. What kit did you use and was it an easy build? Thx!
ReplyDeleteHi Julie!
DeleteI don't recall the exact kit as we worked with a team from Home Depot long before my bloggin' days. :) They were wonderful to work with and my husband and his father had it assembled within one day and shingled the following. However, Home Depot also offers installation services as well I believe.
xoxo!
Love this redo!! And the nerd in me noticed the "3"s all over the stencil. A play on the 3 P`s in your life!!!!!!! Keep on!!
ReplyDeleteThat is so awesome!
DeleteWow! What a transformation! I LOVE that stencil, I am definitely going to get one! I didn't even know Amazon did Stencils! :) Loving the sunny yellow colour theme too, brightening things up makes your heart do a little happy dance and be more inclined to keep things tidy long term, I've found!
ReplyDeleteHmmm... I feel a Garden Shed project coming on..!
Love the little pot plant finishing touch too, so cute! :)
That looks gorgeous. Great ideas for when we finally get the cash to build a shed on our property. But I know if it were me and I had to shimmy past the riding mower every time I wanted to grab my garden tools they would end up in a heap in the front corner instead of neatly put away. I would probably add some pegboard to the back of the door for often used tools.
ReplyDeleteLove it! I am contemplating putting a shed in our back yard. You mentioned a shed kit in your post, do you remember where it came from/level of difficulty? Thanks so much!
ReplyDeleteHi Aimee!
DeleteThe kit was from Home Depot many years ago, although, I believe they still offer sheds and services. My husband and his father did all of the work within about a day and a half.
xoxo!
Can you explain the spray adhesive on the back of the stencil? won't it make it stick to the pegboard and leave a sticky layer? Just want to make sure I'm understanding correctly. I read this yesterday and bought peg board when I got off of work!
ReplyDeleteHello!
DeleteJust use a light layer of the spray adhesive and it won't permanently adhere if you work quickly. And the more you move it, the less sticky it becomes. I ended up only spraying it one time for the entire project and it worked great.
Best of luck!
Such a great tip to spray the adhesive on the stencil before painting! Also, I love the clear containers for the seeds. The space looks great!
ReplyDeleteoh Jen, I can´t beleive my eyes! what a wonderfull things you have in your country!
ReplyDeleteYou are genius!
Silvina from Argentina (South America)
How big is your shed? It's amazing difference & looks huge now!
ReplyDeleteHi Ashlee!
DeleteThe shed is about 8' x 10'.
Thanks!
Absolutely exquisite! And you're pushing me to get a Silhouette. : ) One question - any reason you didn't want to paint the walls? (Confession: as an architectural color consultant I tend to want to paint everything.)
ReplyDeleteI really thought about it since I rarely leave spaces/walls unfinished. But we really just wanted to get the space organized for now, paint may come later once the garage and storage room are finished. I also worried that with the amount of traffic the interior receives, that the plywood would walls and floor would eventually show wear and chipping and require a lot of maintenance. So only time will tell I suppose. :)
Deletexo!
Hiya, I love your stencil pattern, but the Amazon link provided brings up a different design? Could you check it please? Sorry to bother you, but I really love that pattern! :)
ReplyDeleteSorry Shell! Why don't you give this one a try: http://amzn.to/1kTuJqw
DeleteHi, I love this renovation. It makes me want to get started on my shed. I also love your garden caddy. Where did you find it? Thanks!
ReplyDeleteHi Courtney! The caddy was purchased from Target earlier this season.
Deletexoxo!
Looks great! Think it would look even better if you painted the entire pegboard a solid brighter yellow color. It would have done more for this type of space.
ReplyDeleteWas your shed pre-built or from a kit? We need one!
ReplyDeleteHello,
DeleteThe shed was purchased as a kit and we installed, painted and shingled it. We purchased it from Home Depot many years ago, but I believe they still offer similar styles and options.
xoxo!
Very nice update and organization. It is so important when taking on a big task to break it down to keep motivation and energy up! xo
ReplyDeleteStenciled pegboard! Genius! Now I'm trying to think where I can add some pegboard!
ReplyDeleteLove the pegboard! The color is just perfect! =)
ReplyDeleteOur shed NEEDS some pegboard going on, we've cleaned it out but it needs a little beautifying now! LOVE this!
ReplyDeleteJust gorgeous! Where did you purchase the floral washi tape on the bottle of vinegar spray cleaner? xx
ReplyDeleteHi there! The washi tape was purchased from CuteTape.com: http://www.cutetape.com/shop/chugoku-flowers-washi-tape.html
Deletexoxo!
Very nice job. Love the before and after shots.
ReplyDeleteMy shed definitely needs an update! After looking at yours, I'm inspired to pretty it up!
ReplyDeleteI too was wondering where you bought the blue washi tape with the flowers. Thanks!
Hi there! The washi tape was purchased from CuteTape.com: http://www.cutetape.com/shop/chugoku-flowers-washi-tape.html
Deletexoxo!
I am a faithful reader of yours and in a way, you have inspired me to start my own organizing blog & business! I have a technical question....how do you create your before & after pictures, and how do you add text? I have heard of a few apps that are helpful with collages - InstaCollage and DipTic - but wondered what you use. Thank you!!!
ReplyDeleteHi Emily!
ReplyDeleteI personally use Photoshop to do the overlay graphics on my photos, but I have heard that Pic-Monkey is an option that many bloggers love as well.
xoxo!
I love the storage of your seeds and other packages! Overall, it looks really pretty! I have to do something similar on my own. Now I keep all these things in the basement but there is less and less place so why not building such shed? Lately, I have ordered many seeds packages from https://gardenseedsmarket.com/vegetables-en/ as they have a lot of veggies that makes me want to try growing them! I am adding this post to my favorites, it will be a good inspiration for me!
ReplyDelete