Friday, February 18, 2011

60 February Challenge: Project Photography {step 4 - organize remaining prints}

Last week I shared how I was organizing my prints from "this year".  Meaning current... staying up to date with my printing and photo taking by using Project Life.  However, that didn't talk about that giant back log of photos I still had tucked away in a storage drawer in the basement.... You know, photos from growing up, high school, college days, weddings, events, travels and our new babies.  Yeah, ALL THOSE!  Talk about daunting.  And I only had two albums and a photo box full....


As you can see above, I was "somewhat" organized in the photo box, pictures had already been sorted down by "categories" and bound with cardstock to keep them separated.  The two albums contained vacation pictures in one, and favorite prints in the other {which ended about 5 years ago}.  I know that I don't have the backlog that some do, and started off in a pretty good situation, but I still had some work to do to make the system more effective.

I guess that's what years and years of no system can do!  But I knew that after working away at all those old prints, I would make my life much easier in the future to have a good system!  I had a couple of products on hand already, since I always had good intentions of getting this job done.  I had this case:

Large Photo Keeper with 12 Cases (Clear) (5.14" H x 9.71" W x 14.98" D)

And some new boxes I had picked up from Walmart for about $6 each:


What I absolutely LOVED about these boxes is that they were much larger than the standard photo box size.  Actually, the box itself was the same size as a standard sheet of printing paper.  8 1/2 by 11 inches.  That meant that I could store photo cards inside, from all those holiday greetings we have accumulated over the years!  SCORE!


Now, let's back up a bit.  I bought the plastic photo storage case a little prematurely.  I loved that it had a hard plastic case to protect my groupings of photos.  But now that I was finally getting around to doing it, I realized that I am kind of vein.  You may have already noticed this about me... but sometimes I get a solid reminder, like in times like this.  I didn't want to leave the plastic case out on my bookshelves for the world to see.  It wasn't "pretty" enough for me.  And it looked clunky vs. blending in with our decor.  So, goodbye plastic carrying case, hello new turquoise photo boxes!  I decided I would just place the individual plastic dividers into the photo box vs. the carrying case.


Time to sort.  I made a list of categories that I wanted to sort down to {this would definitely be different for everyone}, and whipped up some case labels in photoshop {I found a free template from this amazing website and then modified it in photoshop to be used as these labels}.


Then, I just sprawled the open cases around me and sorted from my stacks of photos accordingly.  I have to mention, I used the same methodology here as I do with my digital file sorting.  I only kept the photos that meant something or were of good quality.  The rest were tossed.


I quickly discovered that I still have a lot of photos that had no room in the plastic cases.  So I have done what I can, and will most likely invest in one more set of cases for the remainder of our prints, because so far, I am loving that they are sorted and protected and prints will be much easier to find and flip through than in previous days!


I am such a sap, doing this brought so many tears to my eyes.  It was so fun to look back at the kiddos baby pictures, pictures from their first days, pictures of the hubs and I growing up and dating.  Memories....

This also made me realize that I have a lot of precious prints from the past of my boys, that I haven't revisited in years.  I decided those needed to stay out on our coffee table.  For now anyway!


I also realized that I had a lot of awkward sized pictures and enlargements floating around, either removed from frames or that never even made it into one.  Those found a home in a scrapbook sized box.


And last but not least.  Greeting cards.  Holiday cards.  Photo party invites.  All those pictures from others that you just gotta hang on to over the years.  I always wondered what to do with those.... until I found that they fit perfectly into these new boxes!  WHOOP!!

The problem was that going through my stack from years past, I didn't do a great job labeling the year on them.  So it is really hard to know for sure.  So those got dumped into an "archived" category of sorts.  Then, I just prepared for the next ten years....

I used photoshop again to create dividers for the box....


Which I also matted on scrapbook paper for added strength...


Then, I just placed the holiday cards in their respective new homes!


I am so excited to have an easy place to pop cards going forward!  Another example how spending some time getting organized now, will be a huge time saver in the future!

So now that the photos have a place to call home within their boxes, the boxes all get popped onto a shelf on our TV stand...


Along with our Project Life album and previous years photo books....

So, still on the ol' "Project Photography" to do list:
  • Finish organizing remainder of prints into cases
  • Come up with a special way to organize vacation photos {since there seems to be an abundance of these specifically}
  • Potentially invest in a photo scanner to digitize my favorite prints from the past {since I have a fear of losing them, going digital would assist in my goal to store them safely off-site}.  I am looking at something like this to make this easier for me, does anyone have experience with a photo scanner?  Thoughts?
  • Spend at least 15 minutes per day on my digital file organizing, until it's caught up.
  • Burn digital files to disc and store in Safety Deposit box {this is the method we decided would be most cost effective for us.  We are also going to give an online back-up system a trial run as well before investing in that route.  It's important to weigh out all the options}
I realize that tackling photos within one month may not be realistic for everyone.  It definitely isn't for me, since I feel like I have an infinity amount of digital files to get through still and not as much free time as I wish I had.  But the point is to have a plan that's easy to stick to and realistic in achieving the long term goal.  It's OK to re-asses throughout a project.  And focusing on photography this month has already helped me achieve oodles and has not only gotten me motivated to keep at it, but is setting me up to succeed going forward! 

Now we get to play the "what works for you?" game.  How are you tackling all those old prints from the pre-digital days?  How are you storing them?  How about greeting cards and photos from family and friends?  Am I the only one that cries when sorting through these?  Such a softy!  How is "Project Photography" coming along in general?


I decided a little challenge would be fun! This month we are getting all those pictures in order!  Wanna join?  Take photos and blog about your awesomeness as you go!  I am hoping to do a giant, "We did it!" celebratory post where we can all link up our picture organizing success stories at the end of the month!

Thursday, February 17, 2011

46 IHeart a Good Weekend Update!

We got our paint on last weekend.  I gave you a glimpse of the color here, when I shared a little jewelry project that I completed....

Today, I am gonna give your the full reveal of the new color, and share a couple other small touches that made a HUGE difference in the space.  In fact, it once again amazed me the power that paint has on a space... seriously, I thought the room was OK left white, {since we knew residing in the guest room was only a temporary thing}...and I shared the full room reveal with you here.


It seemed as though we had brought in plenty of color by painting basically everything else in the room, and through bedding and the office closet/curtains.  All great solutions to renters that can't touch a paint can in their rentals... but I have to admit... the white walls REALLY got to me.  They even got to the hubs, so I knew they were bad.  Seriously, when I tell him I am painting a room {again}, he typically gives me a look of "really?" or rolls his beautiful hazel eyes.... but this time he was like, "Absolutely go for it!".  Yikes....

So, after living with loads of paint swatches stuck behind the trim... I finally just snagged my favorite swatch, had the paint mixed, and went to town on the room!  I just want to mention for the first time ever I didn't tape out the walls, and tried a short handled trim brush instead {based on the suggestion of the YHLers, just not the exact one they use}.  And it was MAGICAL!  So much easier, making this paint job uber quick which is perfect for a busy mom!!

Anyways, I used Behr's Premium Plus Ultra in Burnished Metal.  It turned out GORGEOUS!


It's a soft gray blue color that seemed to be the perfect solution to blend in all the colors throughout the space!  Yet, it totally made every detail, big and small, POP!


However, aside from the new color, you may haven noticed that I also made a couple of other updates... Starting with the coverlet.  I found it on clearance at Target and new it would be the perfect solution for us since we are always too hot with a duvet and insert.  Plus, I can't STAND duvets, just sayin...  And the price on the coverlet was just too good to pass up...


Yep, only $27.48 marked down from $109.99.  And it was much better than the brown quilt we had previously....  The white throw pillow was also from Target for $24.99.  The white pillow gave a cleaner layering effect, and the previous ivory pillows looked dirty with the new scheme.  They will find a new home within our home....

And that mirror...


It's actually just a small convex mirror with bursts made from poster board... hot glued to the back!


I wish I could take credit for thinking up this super inexpensive WOW statement, but credit goes to this tutorial I followed from the Nesting Place...


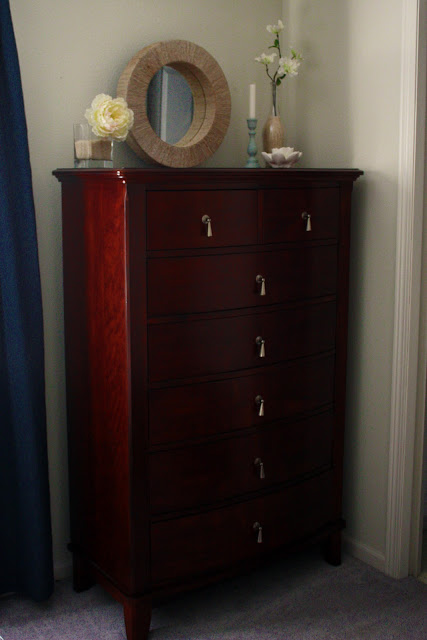
Our dresser stayed almost the same, I just switched up the accessories with others from around the house, including the white branch that I stole from our holiday display...


And the jewelry display rounds out the room tour....


So now for all the glorious Before and Afters....

What once looked like this.....


Then looked like this....


And now looks like THIS!


And this.....


Is now THIS!


And this.....


Is now THIS!


And let's not forget about that little office nook...  Now it pops better than ever!!

Before:


And AFTER!


So there you have it!  The power of paint!  Don't you just heart what it can do in the matter of a couple of hours!?!  Parker even told me he didn't want to leave my new room until I get his done.... hmmmm?


I definitely can't argue with a sweet face like that!

So what do you think, better?  What's your favorite part of the update?  Who else has been getting their paint on?  Trim?  Walls?  A piece of furniture?  How about playing with spray paint?  Or maybe making their own sunburst mirrors?  Share the goods!

Wednesday, February 16, 2011

12 Reader Space: A "Craft"acular Transformation!

Have I mentioned that Wednesday's are pretty much one of my favorite days here on the blog?  Because I get to show the world how awesome you guys are!  That's seriously SO MUCH FUN!  You all provide me with so much eye candy and inspiration... it's your fault that I make last minute runs to the home improvement store or go back to my junk drawer and give it another once over... AND THAT IS A GREAT THING!  Thank you!

Let me tell you, that I have a feeling we all will be wanting to get a basket and toss a pretty label on it, after seeing today's Reader Space.  Maybe even transform a whole mis-matched room.  Or beautify with some fabric.  Are you ready for this?!

Alicia was trying to decide whether to place spiff up her current craft zone or move it to a sun room.  She decided on the first option, and boy are we lucky she did because it looks AMAZING!

But here is where she started:


"It's a total mess.   In my defense, I had just made a thrift store and Walmart run and dropped everything in here.  It's not normally this bad, but I'm just trying to keep it real for y'all.  I didn't pick up anything..."

I adore that she was keeping it real!  Never be ashamed of your before!  We all have a "Before" story, and they make for the best "Afters"!


"I can honestly tell you, this is the most unplanned, sporadic "fix-up" I've ever done. I usually plan, plan, plan.  I had no idea I would be redoing my craft room when I woke up that morning."

Ok, so are you ready for your hearts to start racing?  For your jaws to drop?  To see the power or labels and paint and some arranging?  You have been warned....


Here is how Alicia made the spectacular transformation happen:
  • She rearranged her work areas to make them more functional for the space
  • She put her shipping supplies in one spot
  • The walls got a fresh coat of paint
  • The bulletin board was painted red {AWESOME POP OF COLOR!}
  • She added more light
  • She covered/tucked away seldom used items behind a curtain
  • She created a magnet/chalkboard station
  • She added additional storage


Look at the power of cheapo plastic baskets paired with adorable labels!!  INCREDIBLE!


And some more shots of how she organized "the little things"


Giving one amazing before and after Craft Room transformation!!


I told you this would leave you inspired!  And motivated?  I know my wheels are spinning!!

A special THANK YOU to Alicia for letting me share her incredible transformation today!  You can see this along with much more awesomeness, on her blog!

What's your favorite part?  Let's play that game?  I can't get over the memo board {both the red one and the magnetic chalk board one!}  And those white labeled baskets... or that curtain... Ok, I can't pick just one thing!!  Swoon!!


And a button for you....


IHeart Organizing


P.S.  Have an awesome organizing story to share?  I am looking for projects that have made a positive impact to your life.  Please send your story and photos to iheartorganizing@gmail.com and I would heart to feature them right here, on the blog!!  Photos should be high resolution and un-editted.  Please include a description of the project, including any costs, inspiration, and how it has changed your routine for the better is so helpful!  Oh, and no worries my friends, we will NEVER judge "before" pictures because that just wouldn't be nice!  Only love goes on at this blog!