

Today I have a fun and free project to share that was inspired by a messy drawer I opened this weekend.

I have grown completely understanding that organizing is an on going process and that occasionally some systems don't work out the first time. Or the second.
Our junk drawer never seems to stay organized. No matter how many times I have re-organized it, it always ends up becoming a catch all for anything and everything. That means that the items we should be storing within the drawer become lost in the shuffle.

There is only so much you can do with a junk drawer. Half of the items I dumped out have a dedicated place to call home, they just never made it that far initially. So lesson learned team Jones. put stuff away where it belongs instead of tossing it in the "junk" drawer. Problem solved.

So I did what I always do and dumped everything out, sorted, tossed and put things away where they really should go. I even found a dollar and two gift cards! See my friends! There is always value in organizing!
I decided that in order to remedy the situation, I would have to add a few more organizers. This would allow me to categorize a few more items as well as prevent the previous organizer from sliding around within the drawer. Lastly, this time I would be adding labels so there is absolutely no confusion about what belongs within the drawer.
Once the previous organizer was empty, I added a little life by lining the bottom of the tray with decorative paper. I have a few bins of pretty paper from my scrapbooking days, so I was able to use what I already had on hand.
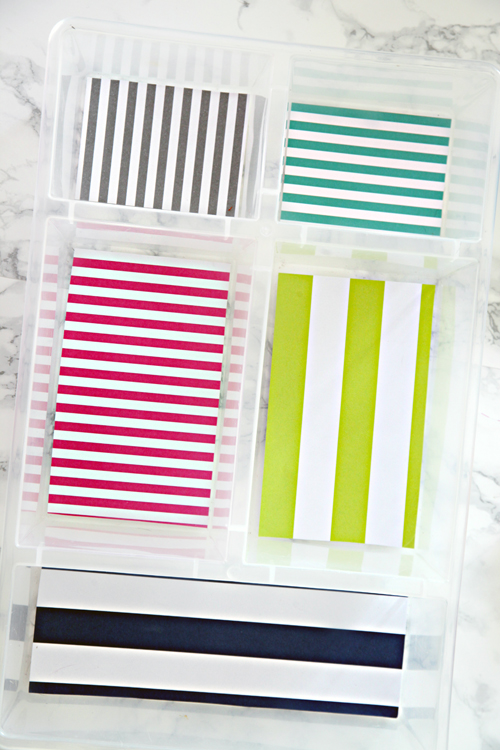
Next up, I made a couple of boxes out of more sheets of scrapbook paper. And they were so darn cute and addicting that I made a few extras for other drawers as well.

All you need is some scrap-paper and you can easily make a little box/tray for organizing or anything you wish really. However, I did find that the stronger the paper, the stronger the box. Go figure right?

- Start with a square piece of paper.
- Fold it down the center and then down the center again to create four equal sections. Open the paper back up.
- Fold each corner into the center of the paper.
- Visual of progress - all corners folded in.
- Fold one edge to the center.
- Fold opposite edge to the center.
- Open back up to reveal new creases and only two corners folded in at the center.
- Now repeat on the opposite two sides, folding each edge to the center {leaving the other two edges unfolded}
- Visual of progress - two edges folded in meeting at the center.
- Fold one edge over at the crease in paper.
- Push in edges of paper.
- Fold over edge to create one side of the box.
- Repeat on opposite side, folding over the edge to create the opposite side of the box.
- Wiggle a little bit until all edges are straight.
- Celebrate! Pretty sweet huh?

Once I had some little boxes created, I popped everything back into the empty drawer. I also added a couple of pieces of clear packing tape to the bottom of the newly created paper boxes for a little added strength.

I categorized the items I want access to on a daily basis because we actually use them within the kitchen frequently... and the added some labels to the organizers.

For the labels, I used some Martha Stewart stickers labels {found at Staples awhile back}, which I paired with my label maker and clear label maker tape.
And a full view of the after.

This view makes me giddy inside! Maybe those sweet little flower boxes and labeled organizers will actually do the trick this time? Or maybe I will just have to be OK with the fact that the junk drawer clean-out is an annual task. Either way, all is right in the drawer for today.
I love anytime I can use what I have at home to whip up something pretty and functional. You can also see how I used cereal boxes for drawer dividers here, as well as cardboard boxes paired with fabric for great storage bins here. Now to put the rest of those sweet little paper boxes to good use in other drawers around the house.

Have you been DIY'ing any storage big or small? How about taking back a drawer that is always a small thorn in your side?
I love all of your ideas, Jen! The boxes you created are adorable; the patterns so fun!
ReplyDeleteOh man. I love all y'all bloggers, but you mamas NEED to stop posting about It Which Shall Not Be Named (back to school) to us school teachers! I have a whole 'nother week, darnit!
ReplyDeleteJK, love the paper boxes, might maybe find a way to make 'em with the kidlets.
These are ADORABLE! I absolutely love them, and am thinking of other possible uses as well - so clever. :-)
ReplyDeleteLooks great! Do you remember where that calculator is from?
ReplyDeleteThank you! It is a Lilly Pulitzer calculator that I found on Amazon.
DeleteLooks great!
ReplyDeletep.s. Did I miss the last organizing link party? Is it still live?
Hi Amanda!
DeleteTime totally slipped away from me and I didn't get one up at the beginning of the month, so one will be posted very soon! Stay tuned. :)
xo!
Brilliant! I love your no/low cost organizing tips/projects. It's so nice to see your organizing change and grow with time. You don't always get the in between stages in blog land. Thank you.
ReplyDeleteThank you for this great tutorial of how to make these cute boxes. I so need them!!Have a great week!♥
ReplyDeleteI love making those origami boxes! I have some gorgeous calendar pages I am going to make some out of for storage myself (an old Paper Source calendar - my favourite!). I think the junk drawer is definitely a regular on the organising list. :)
ReplyDeleteThese boxes are so pretty! I've been needing something to keep makeup in for when I go to uni and I think a few of these would work perfectly and look really cute on my desk!
ReplyDeleteGreat little tutorial - I've just made 2 sitting at my desk....I'm supposed to be working but this is much more fun!.....good job I'm my own boss;)
ReplyDeleteThese are so gorgeous. I'd love them to store all my makeup in! x
ReplyDeleteThis comment has been removed by the author.
ReplyDeleteJen, I.love.these! Your drawer looks awesome and I can totally see myself becoming a little obsessed creating these boxes once I mess up my first one. I also have some scrapbooking paper laying around from my non-scrapbooking, tried to be creative days so off I go to try another of your fabulous ideas...you and I are kindred spirits in the organizing fashion so I look forward to reading your posts as the inspiration I need to keep my home feeling comforting to me and my family.
ReplyDeletePeggy :-)
Ha! I learned how to make these boxes in elementary school but totally forgot! They look great, thanks for reminding me!
ReplyDeleteI love this idea! Cannot wait to try it! I just gave it a go with some printer paper here at work and I need to work on it a bit more. Thank you for sharing!
ReplyDeleteGenius idea! I have piles of leftover scrapbooking paper I could use for making these! What is it with junk drawers anyways!? They are nightmares to keep organized.
ReplyDeleteI love that organizer from Ikea, I've got a few around the house now and a couple more are on my list for our next shopping trip there! To keep the organizers from sliding around the drawer I use sticky Velcro dots on the bottom. One side sticks to the drawer and one side on the bottom of the organizer. Still easy to pull out when needed, but everything stays in place too.
ReplyDeleteGreat tip to use Velcro Jeanna! Rug pads and Command Strips have also done the trick for us from time to time! xoxo!
Delete...pretty organized!
ReplyDelete❤️alex.
I bet you can find a silhouette shape to do this with, too!
ReplyDeleteExcellent idea! We can totally use paper scraps for creating storage here at our office!
ReplyDeleteThanks for sharing!
Team Craftwell
blog.craftwellusa.com
Great looking junk drawer! As soon as I publish this comment, I am off to tackle mine! Can you tell me what kind of label maker you use? I have an old one that they don't make clear tape for and I love the idea of using clear tape on cute labels and washi tape to jazz things up. Thanks again for all your great posts and inspiration.
ReplyDeleteI have been using the Epson LabelWorks LW-400 for quite awhile now and have been quite happy with it! You can snag all of the details in this post here:
Deletehttp://iheartorganizing.blogspot.com/2013/07/labeling-101-label-maker.html
xoxo!
Just beautiful! I love your pictures, almost as much as I love an organized drawer!!!
ReplyDeleteoh my god! i love it!! thanks so much
ReplyDeleteI love this SO much! I have a desk drawer that serves as my catch all and I can't quite keep it organized. Perhaps some fun boxes and dividers will do the trick?
ReplyDeleteMy recent DIY storage was about a low-level as you can get, but after emptying out and cleaning the kids' toothbrushing drawer (ewww . . . !), I lined it with pretty paper and was about to just put stuff back inside when I remembered I ought to corral the toothbrushes, floss, toothpaste, etc. I had one cake mix box in my recycling, so I glued the flaps back down, then cut it in half and at least had two narrow boxes to put things in. I'll make a couple more when I have something else to cut down. I didn't cover them, but at least I put them in there and it looks 100% better.
ReplyDeleteYou are so awesome!!! Thanks!!
ReplyDeleteColourful; fun; practical! :)
ReplyDeleteYou make everything seem so achievable!
Ah I wish my drawers looked like that haha!
ReplyDeletehttp://idiscussbeauty.blogspot.com/
It looks great! Our desk drawers end up being a huge catchall, so I find it essential for me to clean it out periodically. Sometimes life just gets in the way of organizing, but you did a beautiful job to make life a little bit more lovely.
ReplyDeleteI love this! My desk junk drawer is taking on a life of its own and my ONE goal is to clean it out before school starts next week for me. I will now spend the rest of my night folding paper. Thanks for this!!!
ReplyDeleteThis is sooo helpful, I'm always looking around for boxes cause I just hate having things dancing around in my drawers. I think the boxes would make a pretty gift box too :) X
ReplyDelete| www.noirettediary.com |
I wish the folding pictures were just a wee bit bigger. I am really interested in making those boxes and I just can't see them clearly enough. I know you wrote out the instructions too, but it is easier (for me) to follow along with a visual. Your end product looks beautiful!
ReplyDeleteCutest idea ever! I made a few to hold jewelry on my dresser and another to keys on a shelf at the back door.
ReplyDeleteOH Jen! When I saw the photo of your drawer I got a little anxious for a second thinking you were at MY house! LOL! Guess what you have inspired me to do tonight? I am going to make some for my desk drawer at work too. Thanks for the always inspiring ideas.
ReplyDeletethis is so clever! my drawers are always in such a state, I'm always looking for cost effective ways of organising them!
ReplyDeleteLove it! How do you size the paper so that the finished box size is the correct dimensions for your space?
ReplyDeletethat would probably take a little math and playing around. I just used a square sheet I had and the size worked great for this drawer, with just a little lost space. Not sure there is an easy way to pre-plan exact end dimensions.
DeleteI can help. Multiply the desired box length by 2.828 to get the starting paper size. So if you want your box to be 3 inches by 3 inches, you would start with a piece of paper that is 8.484 inches by 8.484 inches. An 8.5" square would probably be close enough. :o)
DeleteThanks for sharing the instructions for the cute paper boxes. We used to make these when I was a kid. We fit two of them together, top and bottom, and used them as May Day gifts with fresh flowers inside. That's what you get when growing up in a rural area! But now the problem is, with these in my toolbox, it gives me license to buy more cute cardstock, which has to be organized. LOL.
ReplyDeleteI love this-- just what I was looking for! Thanks for posting!
ReplyDelete