


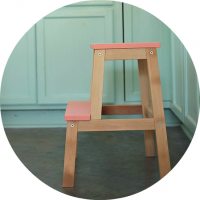
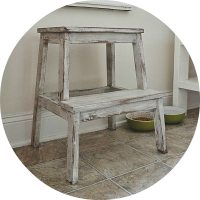
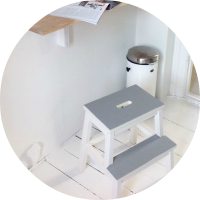
We already had one of these BEKVÄM stools from IKEA, and it was used all over the home until it landed in our utility room. Knowing how much we love the stool and how sturdy it is, I decided to snag a second one for the main bathroom.

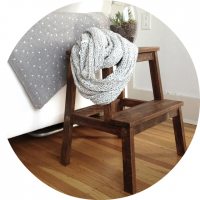
The stool comes unfinished so it really is a blank canvas. I knew right away that I wasn't going to leave it the natural finish, but still liked the idea of bringing some wood tones into the bathroom. Using leftover stain and poly from our bookcase makeover project, it became a beautiful walnut finish.

The stain caused the grain to raise a bit and in the morning I had noticed some small drips had formed. Because the stain is a stain/poly mixture {I used this one specifically}, I was able to lightly sand it and touch it up.
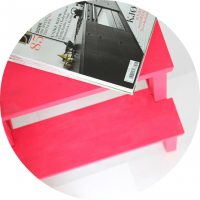
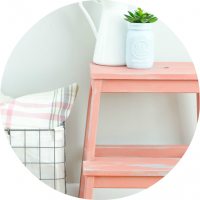
I wanted to bring in a new color to the bathroom, and I knew this was the perfect place to start. I dug through my paint sample bin and found a beautiful coral color called Strawberry Rhubarb by Behr. Using painters tape, I measured and taped a few stripes on the top of the stool.

Two coats later, and I was ready to peel the tape! Don't you get so giddy when you see a nice and crisp line?


As soon as it was cured, I placed the new step stool into our half completed bathroom.

I am kind of obsessed with it.


We don't have a rug down yet, but I added a few felt pads to the feet so the stool can slide nicely across the floor to the sink.

The bathroom seems to be moving pretty slowly for the little amount of work we had to do to make the update, but we are now near the finish line! Just a couple more finishing touches and I can share the entire thing soon. Until then, let's slow clap over this charming little coral addition.

I really could snag a few more of these guys for all over the house. They are just so great for little toes.
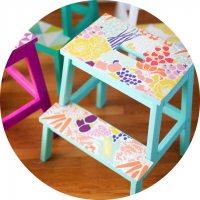
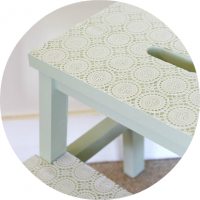
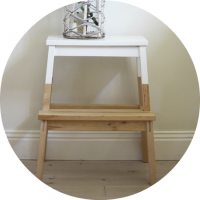
And for some added fun, I rounded up a few more amazing BEKVÄM stool hacks from around blogland.
 |  |
 |  |
 |  |
 |  |
 |  |
.png)
Looks awesome! I'm inspired to knock one out for our little guy's use.
ReplyDeleteDo you think just a regular stain would need touching up? Do you think it was the poly that caused the drips?
Thank you!
DeleteI stained the stool after I assembled it thinking it would be easier than rotating all of the sides of each piece. However, there were a lot of small cracks to get my brush in, and that is where I noticed the drips the following morning. Regular stain tends to seep into the wood better, and is always wiped off with a rag, while this stain is brushed on and not wiped down after. I just used what I had on hand, but you may find a regular wood stain is a little more forgiving.
xoxo!
Your IKEA stool hack looks great. I have an IKEA kitchen cart I want to stain but I've never done it before so I'm scared I might ruin it... Any advice? which stain is best and any tips for applying?
ReplyDeleteHi Naomi,
DeleteI was also a little nervous because I wasn't sure how IKEA pieces would take stain without much prep, but it absorbed pretty well and the color took nicely. There were a few spots that didn't absorb as well as others, but overall I was happy with the results. I used a stain/poly combo, which I already had on hand, and appreciated since the stool was going to be in a bathroom with water drips, but I am guessing any stain would do just fine, especially if you add a protective finish. I always just follow the directions on the back of the stain can as closely as possible {most stains should not be sanded, stains with poly can be, etc...}
Best of luck!
Jen
Where did you get that great navy/white shower curtain? I didn't see that in previous posts.
ReplyDeleteHello,
DeleteThe shower curtain is from HomeGoods. :)
xo,
Jen
I'm deeply in love with your shower curtain. Any chance it's still available somewhere?
ReplyDeleteHello,
DeleteThe shower curtain is from HomeGoods. I purchased it within the last month, and it was a fantastic price! If you can't find it there, you may have luck with Marshalls or TJMaxx since they are all affiliated.
xo,
Jen
It looks wonderful. The contrast of pink with the walnut finish are great! Did you use anything to seal/protect it once you put the pink paint on there?
ReplyDeleteI didn't initially because the stain already has a protective poly finish and the paint sample was a paint/primer combo which should cure nicely. The only feet that will land on the stool will be bare or with socks, so it should hold up OK, but adding a protective finish never hurts anything.
Deletexoxo!
I love your hack, Jen! I wish I lived closer to an Ikea so I could snatch one of those stools up!!
ReplyDeleteHI Jen,
ReplyDeleteI love your work and Blog. Just one small thing - what you have done is exactly what Ikea intend and that is painting the bare wood to make the product fit your home. A hack is when the original product is modified and changed from its original purpose, I am a pedant I know, but I got excited when I saw 'hack' and while impressed with the end result was disappointed it was only a paint job :0) M
lo faro anche io.....saluti dall italia
ReplyDeleteWhere did you find that beautiful silver container for the flowers and does it tarnish?
ReplyDeleteHello,
DeleteThe flowers are in a julep cup, I have had it for awhile and believe I found it on One Kings Lane. I don't always keep it in the bathroom, just occasionally and no tarnishing. Although, I had a small vintage tray in the bathroom for awhile and it tarnished very quickly. So now I just limit the exposure to steam. xo!
This looks great. Crazy how good you can make IKEA things look with a little extra love. I am toying around with one of these stools as a night stand in the guest room.
ReplyDeleteCute stool. I love your cabinet pulls, but I fear the boys banging their knees. My twins would!
ReplyDeleteYour stool is beautiful! Though it's more of a tweak than a hack since all you did was change its color (you didn't alter its design/construction). It's fun to see you sneaking in more pink into your house.
ReplyDelete*Face Palm* I agree and stand corrected. :) Thanks April, the post has been updated.
DeleteKeep an eye on this stool as it will need a regular check to keep all the screws tightened up .We had one which my husband stood on to change a bulb and it collapsed and he broke a finger.
ReplyDeleteThat's awful! Thanks for the warning!
DeleteGreat stool! You probably already know this, but I just learned a tip from a painter we had in a couple weeks ago. To get really crisp lines, after putting on the painter's tape, go over it with the original color and let that dry. Then go over with the new color. Anything that would seep under the paint would be the original color and that would seal it around the tape. I'm going to give it a try with some furniture I'm painting soon.
ReplyDeleteThanks Michelle! We always follow that method with stripes on our walls, but wasn't sure if that would work with stain since it soaks into the wood. xo!
DeleteWe've got a "boring" one of these in our spare room - thank you for sharing, you've definitely inspired me to have a go at decorating ours this weekend!
ReplyDeleteAlthough i have to admit i'm a complete DIY amateur so think i might have to just start with some washi tape!
xx
I love this idea! I have the same stool hanging in my laundry room and it is so useful for so many things! Love how you stained/painted it! So creative! Kathy @The Daily Nest
ReplyDeleteomgosh. im obsessed!
ReplyDeleteit is so lovely!
Looks great. Can't wait to see the rest of the bathroom soon.
ReplyDeleteYou have the simplest ideas that make the biggest impact! Absolutely amazing. And I love that you chose pink.
ReplyDeleteI love this! I have the stool already, but I might draw some inspiration for yours and repaint it. Thanks for sharing!
ReplyDeleteWow, that looks really nice. If I had room for that in my bathroom, I'd be at IKEA tomorrow!
ReplyDeletecan't wait for your full pic on bathroom
ReplyDeleteClever!! It looks just so fantastic!
ReplyDeleteI love your stool, Jen! It's so cute! Thank you so much for sharing my pink stool! I've always loved your blog and it's such an honor to have one of my projects featured! :)
ReplyDeleteNot gonna lie but your stool is my favorite out of the bunch! I love the wood stain you used, the beautiful coral, and the simple stripes. I want it!!
ReplyDeleteI have one of these stools in white that is just screaming for a little TLC - I love the idea of doing something fun like stripes. Now my wheels are spinning... :)
ReplyDeleteThat is so sweet! Great job Jen - it's adorable :)
ReplyDeleteOk that does it. It is time ( like seriously overdue) to update our bekväm. It is now white painted. Seriously scratched. Paint spots. Sawed. And I honestly dont want to know what else is on there but it is time! Thanks for the inspiration!
ReplyDeleteThis is the sort of thing I always plan to do and then don't do. Good for you for actually doing it! Looks great.
ReplyDeleteThis would be the perfect project for my guest bedside table! I need a table and a handy step stool for the numerous times I walk to the kitchen to get a chair to get something in the closet. Thanks!
ReplyDeleteWow. You are really creative. The stool is already nice, but it looks even nicer after painted. Fantastic! Good work!
ReplyDeleteSo cute! Thanks for the inspiration!
ReplyDeleteThis piece of furniture is such a versatile piece! You can do whatever you want with it because it is plain :D Yours is pretty !
ReplyDeleteMelanie ♥ www.outofstandards.blogspot.fr
Jen,
ReplyDeleteLove the stool. I think I'm going to try a weathered gray stain with white steps for my coastal style. Thanks for the idea! As an aside..
Do you have an update for your evolving studio? I wait anxiously each week for a new update :) Looking forward to seeing what you've done with the space!
Kassie
Hi Kassie!
DeleteI actually took some time off from working on my studio. I felt like I was rushing it and stressing about it and hitting wall after wall. I am really struggling working with the space because it doesn't have any natural light {so any darker accents feel really heavy} and is so narrow that I can't play with the center of the room. I am hoping to take some updated photos for a new home tour page soon, and will be sure to update you all on the progress as there is any. :)
xo!
This looks great! I love the pop of color for the bathroom!
ReplyDeleteOh! I have this stool! I am so inspired to paint it now!!
ReplyDeleteSo pretty! I need to make one of these for my bathroom!!
ReplyDeleteXO Kelly
www.dettecakes.com
This is GORGEOUS!! Now I need to find a stool to refinish...
ReplyDeleteHi! I actually tried following this cause I loved the finish you used for the Bekvam. I got the exact same stain + poly finish you linked, as well. But it looks like it's coming out a lot darker than what's shown on the picture? Did you sand the whole stool is that why it's coming out with a lighter finish?
ReplyDeleteHello,
DeleteI did not sand the stool prior to adding the stain/poly. I thought mine actually went on pretty light in comparison to the color on the can, but figured it was just because I applied it fairly thin. I am always a little cautious with stain application because it is easier to layer for darkness than it is to try lighten it. Because you are using a stain/poly, you can sand it which may lighten it a bit.
xoxo!