Thursday, January 5, 2012

42 IHeart: Clutter Busting Tips & Tricks!

Today I am kicking off a new feature here at IHeart Organizing that I am very excited about!  Organizing works wonders in different ways for different people, and the number of amazing organizing DIY projects that are out there are far more than I could ever personally tackle and write about.  It is my personal goal to ensure that this blog to be FULL of information, ideas and inspiration, which is why I am hoping to have occasional "guests" here to share their organizational awesomeness with us!


Now that the holidays are over, you may be realizing that you have accumulated more than your home can handle.  And many of you are excited to start purging and organizing with the start of a new year.  That is why today I asked Cristin from Simplified Bee, to stop by with some great clutter conquering tips and tricks!


"We all have sentimental items that we cherish and want to store away, but when is it too much?  And when is it clutter?  Clutter is basically anything that takes up space and isn't improving or making your life better.  If you have clothing in your closet that you haven't worn in years, piles of mail on the counter, toys in every corner or trouble finding important documents, it is time for you to think about purging and decluttering your home.  For many of my clients, letting go of items is the biggest hurdle when organizing their home.


Here are some guidelines and questions you should ask when determining whether to toss/recycle, donate to charity or keep:

Take one item at a time when determining to keep it or not.  While sorting, keep in mind that the goal is to purge and reduce the amount of stuff in your home.  The best decisions are the ones that are made quickly.


If you get stuck and can't decide what to do with a particular item, ask yourself clarifying questions including:
  • When is the last time you used this item and was it in the last year?
  • Is it broken, damaged or the wrong size?
  • Does it make you happy or have sentimental value?
  • Do you really need this item?


For many of us, holding onto the clutter is emotional.  Our possessions reflect who we are, who we are not and who we wish to be.  Emotional attachment to items is something most of us do and the primary reason people hold onto clutter.  Pretty Neat suggests that if you can't make a decision on whether or not to get rid of an item, put it in a review box for a specified period of time.  When the time is up, it should be easier to make the decision.  I would recommend having a limit to how many items can go into the "review box".  It should only be used on very select items and as sparingly as possible.  Again, the goal is to reduce the clutter in your home and make it more functional and beautiful.


Much of the clutter in your home could actually be trash.  Here are some items that are the most obvious to throw away and recycle whenever possible:
  • Junk mail, old magazines and newspapers
  • Expired food, make-up and medicine.  Check with your local recycling center on how and where to dispose of medications safely.
  • Clothing that is damaged, stained or ripped beyond repair.
  • Boxes that are damaged or no longer useful
  • Broken toys, games and electronic equipment


An easy way to declutter your home is to donate items you don't use, but are still in good condition.  Donating to a family, friends or a local charity is a great place for used clothing, furniture, CD's/DVD's, toys, tools and so much more!

 Once you have decluttered your home, the best way to keep it that way is to set up daily and weekly maintenance sessions.  Taking fifteen minutes everyday to tackle that mail, put toys away and organize the entry or mudroom.  At least one a month file away papers in your in box, organize the pantry and review your closet for pieces that could be donated.

Are you ready to conquer the clutter in your home?  There is no better time than today.

Happy New Year!"


Endless thanks to Cristin for sharing her expertise and offering some decluttering guidance!  Who's ready to get started?  What other tips and tricks do you have for pairing down and simplifying?


* all photos courtesy of LONNY Magazine

Wednesday, January 4, 2012

27 Reader Space: Caitlin's Space Saving Shelves!


There are endless options when it comes to creating storage for any given room or situation, but sometimes, the pre-fab stuff doesn't come in the dimensions you need and can be extremely costly.  Today's reader left me in awe and inspired of her ability to take on a storage DIY project all on her own!

Caitlin wrote:

After a summer of building, finding the right storage boxes, and organizing, my beloved shelves are finally up and functional ... just posted about them here - http://www.hardlyhousewives.com/2011/11/shelf-smarts.html

I built them from scratch using pine planks, Minwax stain, and shelving brackets from the Home Depot - total cost to build was around $200 {NOT cheap, but definitely less expensive than getting something custom made for me or buying a bunch of smaller bookshelves for the space}.  From there, I used baskets and bins I mostly already owned, plus a few quick trips to Target and the Container Store for the remaining storage.

I LOVE knowing that all of my paperwork is organized and easy to find.  Like your Lego posts, I also love having space {the two milk crates} for in-progress projects.  My art supplies have all been wrangled into an old wine crate which makes it a lot easier to track down what I need, when I need it.  I'm also a sucker for keeping sentimental things {I have probably fifty-plus letters from my mom throughout the years, all of my shower and wedding cards, old notes from my husband}, but I like to have them stored away, so keeping them tucked out of sight in the polka-dotted boxes is perfect.  My stationery is now organized by occasion, my stamps are always in the same place, and my wrapping paper never gets crinkled because it's always neatly put away in the long storage box on the bottom right.

All in all, it's a huge upgrade to my office and I'm so proud that I built them myself.  Let me know what you think!  I really love your blog and all of your great ideas!
Thanks,
Caitlin

Let's take a peek at Caitlin's before picture:


"When we were packing up our apartment in NY, I found a ton of our important documents. Tax returns, stashed away with old letters from my mom. Our mortgage information, house insurance documentation, and passports all stored haphazardly next to my art supplies. It was a mess and I vowed that as soon as we got into our new home, I'd have a dedicated place to organize papers.

Instead of buying standalone filing cabinets {not exactly the aesthetic I was going for} or pre-built bookshelves {I couldn't find any in the size I wanted}, I decided to build a set of shelves in my office where I could store our papers, my art supplies, my wrapping paper, some design books, and a host of other items that would benefit from some organization.  

I measured one of the bare walls in my office and trekked down to the Home Depot, hoping for some guidance.  The employee who helped me there actually gave me a hard time about it {"Is your husband going to do this for you?  Do you even know anything about woodworking?"}, but that just made me more determined to make these on my own.

Here was step one - finding the wall studs and installing the brackets:


I knew I wanted my planks to look a little more finished, so the next step was to add trim to the edge of the shelves and to stain them.  Using brad nails, I nailed the decorative trim to the planks and sanded everything down.


Next, I took all of my planks into the garage to stain them.  My can of Minwax said that I'd need two coats.  I did about five.  It took that many to get the wood dark enough.  Finally, I took all of my boards up to the office and screwed them into the brackets (already mounted on the wall).  Once my shelves were up, it was time to get organizing!

I stashed all of our paperwork, warranties, and old magazines in files boxes and magazine holders from The Container store.  I keep basic office supplies in that pink tray, and my stamps and to-pay bills in the black organizer.  On the lower shelves, I have a stack of blankets.  


I keep my art supplies in an old wine crate {found in the trash pile of my favorite Brooklyn wine store}, put all of my in-progress projects are stored in the two wooden milk crates.  In the polka-dotted boxes, I have all of our wedding cards, some old letters, and a handful of other small things I want to keep but don't need to see every day."


Ready to see it all pulled together?  Be ready to be in love!


Simply FABULOUS!
  • Caitlin did it HERSELF!  Go girl go!
  • She built something custom that fit her personal needs.  She didn't settle when she couldn't find exactly what she wanted out in the shopping world.
  • She used a mixture of storage essentials that she already had, some that she found for FREE and some pretty ones that she purchased, to create the perfect storage combination.
  • She used the vertical wall space!  All of that clutter spread out all over the floor took up a TON of real estate.  Going vertical is always a great tip.  She was able to use the wall instead of the floor to gain a ton of area back in her room.
  • She found a way to save items that were necessity for tax purposes, and a sentimental need, without letting it become clutter.  Those boxes are the perfect way to easily find all of her documents and keep the paper monster piles away!
  • All of the colors paired with the natural elements of the wood and woven baskets makes me swoon!  It all works so well together to make her office space so pleasing to the eye.

Super star job well done to Caitlin!

Who's left impressed?  What's your favorite part from today's story?  Has anyone else found benefits from going vertical with storage lately?


ATTENTION!!  Want to be featured in a Reader Space edition?  Have an awesome organizing story to share?  I am looking for projects that have made a positive impact to your life.  Please send your story and photos to iheartorganizing@gmail.com and I would heart to feature them right here, on the blog!!  Photos should be high resolution and unedited.  Please include a description of the project, including any costs, inspiration, and how it has changed your life and routine for the better!  Oh, and no worries my friends, we will NEVER judge "before" pictures because that just wouldn't be nice!  Only love goes on at this blog!  More info HERE.

Tuesday, January 3, 2012

6 IHeart: Silhouette Cameo Giveaway Winner & Promo!

A huge congratulations to the winner of the Silhouette Cameo Giveaway!


For those of you that didn't win this time around, Silhouette is still offering their promotion through January 5th {quantities limited; while supplies last}:


From now through January 5th, you can snag a Silhouette Cameo AND fabric ink starter kit bundle for only $299 {you will need to add both products to your cart here}  Just enter ORGANIZING at checkout!


If you already are the proud owner of a Silhouette, the code ORGANIZING will get you a Fabric Ink Starter Kit or any fabric ink supplies for 20% off!

Thanks to everyone who entered!

65 IHeart: Our Holiday Storage

Is everyone still alive after the holiday craze?  The New Year has officially begun and it's time to regain control of our schedules and normal lifestyles again.  Although, I still have a holiday hangover, I couldn't wait to get back into the organizing swing of things!

We had a total of FOUR Christmas's this year, all away from home so if you count our own family one with the kids at home, it was really five!  I think that is a Jones family record, I am tired just typing about it {you can catch up on some of our Christmas highlights here}.

Yesterday, I packed up all of the holiday decor.  It was bittersweet, it always adds so much color and life and happiness, yet at the same time, it's nice to get back to some sort of normal around here.


I had shared a couple of years back 
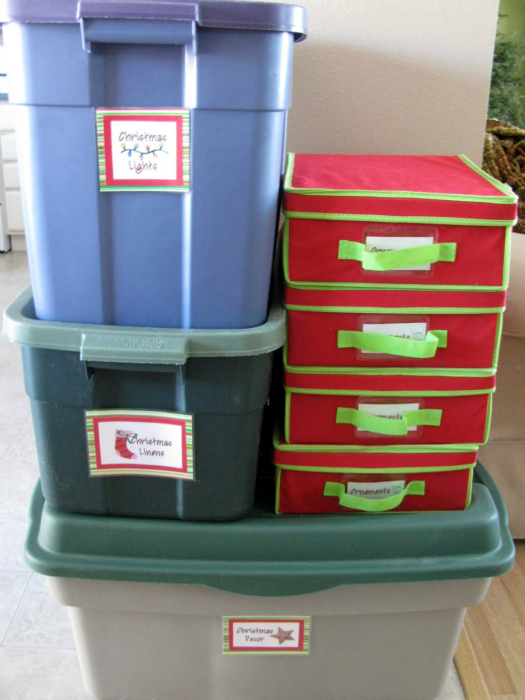
how we handle storing all of our holiday decorations:


Fairly organized, yes.  However, all those bins take up a ton of space.  And this year I was so frustrated with myself because even though I had labeled the bins, I still had to pull one off of the other to open the lid and dig inside to see if what I wanted was there {sometimes yes, sometimes no}.  That's the problem with bins that are not see through.  Plus, our Christmas lights were a giant tangled mess which made the entire processing of decorating the tree take about triple the time.

I was determined to do better this year, so that next Christmas things go a little smoother.  Plus, I have a goal to better utilize our utility storage room {which I will show you once our lower level remodel is done and all of our excess supplies are out}, which meant condensing our holiday storage the best that I could.

So I started from scratch this year.  I took everything off of the tree and our shelving display and created giant piles in our living room.  Then, I gave myself a pat on the back for my ability to get everything stored into two bins instead of three!  It's OK to do some super smiling when you have organizing success!


After some donating and tossing, I was able to keep only what we use and love, yet I still have about as much or more decor than the last time I posted about it.  I must just be getting smarter with age... lol.

So how did I do it?  Well, I used Ziploc bags for just about EVERYTHING.  They take up far less room than the bulky plastic boxes that most of the decorations originally came in.


I find that the bags from IKEA are my favorite for storage.  They last longer and are larger than the Ziploc brand bags:


This bin has so many items in it such as shatterproof ornaments, beads, cones, ribbon, a cookie plate, holiday countdown, printables, etc... The storage bags really made things fit perfectly and maximized the space inside the bin.

I use a disposable food storage container for all of the little things, like ornament hooks and extra Christmas light bulbs:


And a manila folder to hold all of my printables and banners:


The lower bin is full of linens at the bottom, and all of our twinkling lights at the top:


Thanks to the www, I found that you can save space and tangles by wrapping individual strands of lights around objects, like coffee cans or cardboard pieces!  So we cut up a spare box leftover from Christmas and had fantastic space saving, untangled light storage!


It worked like a charm!

We keep all of our fragile ornaments and special ornaments made by the kids inside the stacking ornament bins.  We have been doing that for years and nothing has broken so we are not changing a good thing!


Now because I have two bins that look the same with tons of different items inside, I decided to get creative with the labeling process.

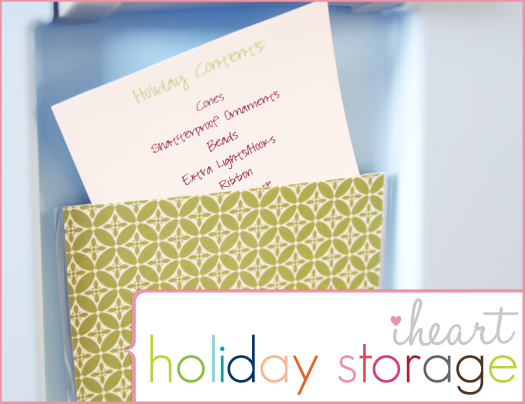
I started out by folding a piece of decorative cardstock in half, and laminating it into a pouch {like I did with my coupon envelopes}:


After attaching the pouches to the sides of the bins with a piece of Velcro, I am able to write a list of the bin contents and tuck it right into the pouch!


Now, since I can't see all of the contents through the bin, I can just pull out the list and know everything that is inside!


And if things ever change, I just cross stuff off, add new things to the bottom, and we are good to go!


In fact, I love this idea SO much, that I have more storage bins for other items that I will be doing this to in the future as I continue on my organizing quest!  The thought of no more unstacking, peeking inside, and re-stacking, makes me H A P P Y!


Feels good to have my first of many 2012 organizing projects checked off of the list!

Anyone else find new holiday storage ways this year, that left you with a big ol' grin?  How many Christmas's did you attend?  Anyone have me beat?

Monday, January 2, 2012

50 Gallery Wall Tips & Tricks

When my girl, Amanda, was in my neck of the woods for the holiday season, we decided to get together and do some type of project.  You know, because that is what bloggers do right?

Amanda's sister was looking for a bit of help with a gallery wall in her bedroom.  So that's where we focused our time.  And I was beyond excited about this since I really need help in the gallery wall department and Amanda is a pro!

Wait.  What?  For someone who has a love for both photography and her home, you would think that I would have seventeen gallery walls.  But nope, my OCD "even" self, tried a gallery wall a couple of years ago and I ended up with something uniform and simple....


And I have longed for something grand and random.  Maybe something down the stairs?  Down the hall?  Something in the playroom?  Or maybe above the sofa in our future lower level family room? 

I have even played with a variety of old and thrift store frames that I have been saving over the years, laying them out in random patterns on the floor.  And you know what happens every single time?  It turns into a perfect square or rectangle.  For some reason, this gal has a hard time making randomness.... I needed a lesson!

We started out with a bare wall, as most would.


Amanda and her sister had already framed some pieces of art and had a number of pieces to select from.  They all had something in common, although, this isn't always necessary when doing a gallery wall.  Just select pieces that you love and that make you happy!

The first thing Amanda did, was clear an area in front of the wall on the floor, and start laying out the frames in a random pattern.  She made this look so easy.  She also mentioned you could take another approach of tracing each frame onto paper and taping the templates randomly on the wall until you get the desired look.  We didn't do that this time, but it is totally another option.

Once she had her desired look on the floor, she just started picking up each frame from the floor and hanging it in the same spot on the wall.


Here were the tips I had learned as she worked her gallery wall magic:
  • Don't leave too much space between the frames.  1-2 inches is about perfect.  
  • Make sure you get a pattern figured out that you love before putting holes in your walls.  Do this by either laying it out on the floor or taping templates to you walls.
  • It's not always necessary {we didn't this time but you will barely notice the frames of a different color since the artwork matches so wonderfully}, but you may like to use frames that are uniform in color.  Different shapes and sizes and detailing to the frames are great for visual interest, it's the color that keeps a uniform look. 
  • Add matting to your art.  Even if it's just a scribbled watercolor painting from your two year old, matting it will make it look like a priceless piece of wall art!

As I watched at how easy and natural this whole process for her was, I was in complete awe watching the transformation take place in such a short amount of time.  In less than an hour {even with some stops to listen to my excessive chatting}, she went from this:


To this!


When playing with her perfectly imperfect pattern, she started with the boldest frame in the middle, and worked her way out from there.


Most of the art is either abstract or nature related.  All of the pieces carry similar tones which really brought the whole display together.  My heart smiled!


I am so inspired now to tackle my own gallery wall.  For realz this time.  And it will be random.  I am thinking lots and lots of random thoughts....

So stay tuned as I share the outcome of my tutorial with Amanda.  {As soon as our weather allows me to whip out the spray paint that is}.  I have the perfect spot just waiting for some gallery wall lovin'.

What other gallery wall tips and tricks have worked well for you?  Am I the only gal that can't seem to do random things like this because of an "even disorder"?  Anyone have any great Etsy shop recommendations as I begin searching for some perfect art pieces?